Originally designed for use in Ethiopia, wicking beds aim to increase food production, while using approximately 50% less water. Think of them as a giant self-watering plant pot. Water is drawn up into the soil via capillary action from a reservoir in the bottom of the wicking bed. Crates, tanks, baths, troughs and drums can all be used to create a wicking bed. Our veggie crates or planter boxes are also the ideal container for wicking projects.The great news about these gardens, is that they can tolerate dry summer conditions better than normal gardens. There’s no need for a fancy irrigation system. So they are great for renters. Because they are far more water efficient, they are also great for anyone who doesn’t have the time to spend watering their veggie patch every day over summer.
Here’s a guide to making your own self-watering wicking bed out of a wooden crate.
Materials & Equipment
- Large wooden crate, or other sturdy container
- Carpet or cardboard to line the crate
- Black plastic, or builder’s film to create the water resevoir
- Scoria, screenings, or other clean rubble to fill the resevoir
- Length of pipe, with an elbow connector (40 mm in diameter, or thereabouts)
- Shade cloth
- Soil and compost
- Spirit Level
- Clamps
- Drill
- Staple Gun
- Shovel
Step 1: Level the Crate
One of the most critical aspects when setting up a self-watering wicking bed is getting it level. If the bed isn’t level, then it’s going to impact on how effectively and evenly the wicking process occurs. It’s going to get quite heavy when it’s full, so it’s a good idea to set it up on solid ground. This should help to prevent the bed from sinking into the soil and become uneven over time.
Step 2: Waterproof the Crate
The whole premise of a wicking bed is built around the container being a sealed, watertight system. If you’re using an old bath, tank or other watertight vessel, you can skip this step.
Waterproofing a wooden crate needs three layers. The waterproofing is achieved through black plastic, or builders film. This material is prone to being pierced or torn by both the wooden splinters on the crate, and the scoria or other material added to the reservoir later in Step 4.
To protect the plastic film, firstly line the crate with either thick cardboard, or carpet.
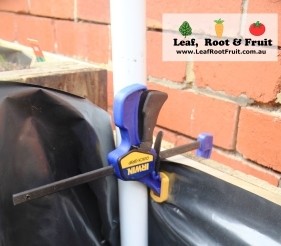
Add your large sheet of builders film into the crate. We find later steps easier if we temporarily secure it at the top using clamps at this stage.
On top of the plastic layer, add a second protective layer of cardboard or carpet.
You might find it easier to add some of your reservoir material now (see Step 5). This will help keep everything in place.
Step 3: Add the Watering Pipe
In order to regularly fill the reservoir at the bottom of the wicking bed you’ll need to add a pipe which goes all the way to the bottom. In order to prevent it from getting clogged, it’s a good idea to add an elbow connector to improve water flow. There’s no need to affix the watering pipe with anything as the soil will hold it in place when you add it later.
Step 4: Add the Drainage Hole
A drainage hold needs to be added at a height corresponding to the top of the reservoir. The depth of the reservoir is not critical. However, the layer of soil above it is.
We’ve found that around 30 centimetres is the optimum depths of the planting soil. So add the drainage hole 30 centimetres from the top of the wicking bed. We use a short length of garden hose to extend the drainage hole and prevent the run-off water from staining the timber.
Step 5: Fill the Reservoir
Now that the drainage hole has been added, you can fill the reservoir. We use scoria or screenings for this purpose, but any clean builders rubble such as broken up bricks, or even small stones can be used. Fill the reservoir to the exact height of the drainage hole.
Too much material added will mean that the soil wont contact the water, and the bed will stay dry.
Too little material added will mean the soil could get waterlogged.
Once you’ve filled the reservoir to the correct level, place a layer of shade cloth to prevent the planting soil from filtering down into the reservoir.
Step 6: Fill with soil
Add your soil, compost or other growing medium to the wicking bed. Don’t quite fill it all the way to the top just yet.
Now that the wicking bed is almost filled, remove the clamps that were temporarily holding the plastic in place. Use a staple gun to fix the plastic to the timber and cut away any excess plastic with scissors or a sharp knife.
Fill the wicking bed to the top with your planting soil.
Step 7: Planting and Watering
Use a hose or watering can to add water into the reservoir via the watering pipe. Keep adding water until it begins to flow out of the drainage hole. At this point, cross your fingers and check for any water leaking from places other than the drainage hole.
Your wicking bed is now ready for planting. It’s a good idea to water the soil from above for the first week as it will take time for the wicking process to fully dampen the soil.
Keep the reservoir topped up. The requirement for this varies depending on the weather conditions, but once a week should be fine in summer.
It’s a good idea to put an old can, jar lid or cup over the top of the watering pipe. This stops the dreaded mozzies finding their way into the water reservoir and reproducing.


If you use a smaller sized container to create smaller wicking bed, such as old laundry sink is there a ratio of screening to soil that can be used as 30 cm of soil would be too deep .
Hi Cants,
I wouldn’t use less than 20cm of soil. If the vessel isn’t very deep then I would just forget the screenings and fill the entire garden bed with soil. It could still be a wicking bed, but I’d make the outlet very low down. Hope that helps. Good Luck!
Will the self watering wicking bed work for planting fruit trees eg. Dwarf lemons, limes..? Can you recommend some appropriate dimensions for building wicking beds for planting fruit trees?
Hi Joanne,
Thanks for your inquiry. A wicking bed will work for some fruit trees. I probably wouldn’t put citrus into a wicking bed though. The don’t like wet feet and are likely to have fungal issues such a phytopthora. If you were going to build a wicking bed for citrus then I would make the soil depth at least 40 to 50cm above the outlet height. But even then, there’s a good chance that the tree will die.
When growing fruit trees in containers such as pots, I always say the bigger the better. As a minimum size I’d say you’d need a 50cm diameter pot. Preferably quite a deep one. For a wicking bed, if you have the option, then I’d go larger again. Say 1200 x 1200 x 800mm (l x w x h). Keep in mind that the tree will generally be better of in the ground than in a pot.
The other issue you will have in growing fruit trees in a wicking bed is that the tree will have access to too much water. This might sound odd, but trees that are over-watered in late summer can have issues with bland, tasteless fruit. This is because all of that water dilutes the sugar.
Good Luck and Happy Gardening!
Duncan